LAB 6 - Jesse and Shingo CS40/ENGR26


HOME Lab1 Lab2 Lab3 Lab4 Lab5 Lab6 Lab7 Lab8 Lab9 Lab10 CODE
Jesse's Portfolio Shingo's Portfolio


LAB DESCRIPTION


This lab focused on the use of perspective project to create 3D graphics. 3D is achieved through the use of a series of matrix transformations on the objects in the scene. Perspective is in general achieved through the use of the perspective projection matrix which scales objects in x and y by the ratio of the focal length (of a virtual camera in the scene) to the distance of the object. A virtual camera can be constructed in the 3D world in order to specify how the scene should be rendered and to provide the ability to use effects associated with a camera including panning, zooming etc.

A camera can be defined using several features:

  1. VRP - view reference point defines the location from which a snapshot of the scene is being taken.
  2. VPN - view plane normal defines the plane through which the snapshot is being taken in 3D space. The tail of the vector is located at the VRP
  3. VUP - a vector describing the orientation of the camera
  4. du,dv - relative coordinates to the VRP defining the size of the camera window
  5. COP - located behind the VRP and aligned with the VPN, this coordinate together with the VRP determines the focal length d.
  6. f,b - points aligned parallel to the VPN which define the back and front of the scene. Outside these nothing is rendered.
There are 3 very general steps to describe the concept of transforming objects from 3D space into an image. First, the camera must be transformed from its arbitrary location, size, and orientation to the origin with its VPN aligned to the z world axis, window scaled to unity, and rotated so that it's local x,y and aligned with world x,y axes. Second, a perspective project matrix is applied which scales objects in x and y by the ratio of the focal length (of a virtual camera in the scene) to the distance of the object. Third the window is scaled and oriented to fit the image size and orientation.

More specifically, the process can be deifined in 7 steps:
  1. Translate the VRP to the origin: VTM = T(- vrp.x, - vrp.y, - vrp.z).
  2. Align the coordinate axes:
  3. Translate the COP (represented by the projection distance) to the origin: VTM = T(0, 0, d) * VTM.
  4. Scale to the canonical view volume [CVV]:
  5. Project onto the image plane:
  6. Scale to the image size*: VTM = Scale( - screenX / (2 * d'), - screenY / (2 * d'), 1.0) * VTM.
    * As given this equation is for PPM images. For TIFF images don't invert the y coordinate.
  7. Translate the lower left corner to the origin: VTM = T(screenX/2, screenY/2) * VTM.


Required image 1: cube using Maxwell's perspective specs
Required image 2: cube demonstrating 3 point perspective

QUESTIONS

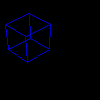
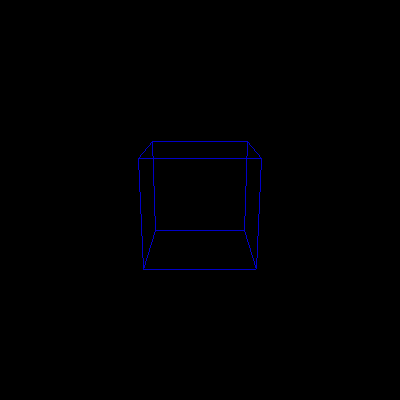
  1. What are the (x,y) values for the eight corners of the cube in the first required image?

  2. (25,25) (75,25) (75,75) (25,75)
    (30,30) (70,30) (70,70) (30,70)

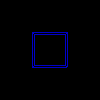
  3. How does modifying the distance between the COP and the VRP affect the appearance of the cube in the first required image?

  4. The effect is to zoom in and out on the scene by changing the focal length. This also changes the amount of the scene that is shown in the screen output. Essentially, the cone that forms what the camera can see is shrinking and expanding.

    zoomed in (relative to required image 1)
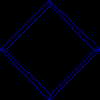
  5. How does modifying the direction of VUP modify the appearance of the cube in the first required image?

  6. Changing VUP changes the angle at which the camera is oriented. If VUP were upsidedown, the scene would be rendered upsidedown.

    VUP rotated 45 deg
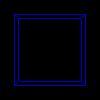
  7. How does modifying the size of the view window modify the appearance of the cube in the first required image?

  8. The cube appears to shrink when the view window is expanded because more of the scene is being shown in the picture. Note that this method yeilds more perspective distortion than changing the focal length.

    view window expanded
  9. What extensions did you do for this assignment, how did you do them, and how well did they work?

  10. We implemented a box primitive, which is defined by 8 points. It has the following functions:

    Box_init:

    Takes a pointer to a box, a point and three doubles. Point sets the origin, and three doubles are dx, dy, dz. It can only create boxes in its standard orientation (as in each side is parallel to x, y, or z axis).

    Box_xform:

    It takes a transformation matrix and a box pointer, and applies the transformation to every point of the box.

    Box_draw:

    Takes a point to a box, image pointer and a pixel. It sets up the 12 sides of the box and draws each one of them. Before drawing, it divides the x and y value of each point by the h component of that point.

    Box_print:

    Simply prints the coordinates of each vertex.

    We used the box primitive to create the required images.

    We also tried to implement parallel projection. We defined a new struct named ParallelView, which has the following components:


    typedef struct {
    Point vrp;
    Vector vpn;
    Vector vup;
    Vector dop;
    double f;
    double b;
    int screenx;
    int screeny;
    int umin;
    int umax;
    int vmin;
    int vmax;
    } ParallelView;

    Unfortunately, it does not work yet.

    We made an animation out of the cube box, where a camera placed on a circle parallel to the xz-plane looks towards the center of the box. The travelling speed of the camera is not uniform, as we simply increment (decrement) x value of the camera by a constant, instead of uniformly changing theta.

    animated in 3D