3D Viewing Pipeline
3D Matrix Transformations
The first change that was made to the graphics system to accomodate
3D operations was the addition of 3D transformation functions. The
following transforms are now supported:
- Translate3D -- translates in all 3 dimensions
- Scale3D -- scales in all 3 dimensions
- Rotate3DX -- Rotates about the x-axis
- Rotate3DY -- Rotates about the y-axis
- Rotate3DZ -- Rotates about the z-axis
- RotateZ -- Rotates about the z-axis
- Rotate3DXYZ -- Rotates about the x, y, and z-axes
- ShearZ -- Shears x and y
- PerspProj -- Performs the matrix transform necessary for
perspective projection
All of these transforms have been adapted to work in the hierarchical
modeling environment created in the last lab.
3D Perspective Viewing Pipeline
Two main changed were made to accomodate a 3D perspective viewing
pipeline. First, a new structure was created to hold all of the
parameters that describe a 3D view. These parameters are:
- VRP -- View Reference Point
- VPN -- View Plane Normal
- VUP -- View Up Vector
- d -- Projection Distance
- du, dv -- View Window Extent in x and y
- F, B -- Front and Back Clip Planes
- screenX, screenY -- desired number of pixels in image
The second change involved creating a function to perform the appropriate
transformations for a perspective projection. The steps are as follows
(taken from Bruce Maxwell's lab 6 homepage):
-
Translate the VRP to the origin: VTM = T(- vrp.x, - vrp.y, - vrp.z).
-
Align the coordinate axes:
-
Normalize the VPN and VUP.
-
Create UVEC = VUP x VPN.
-
Redo VUP' = VPN x UVEC.
-
VTM = RotateXYZ(UVEC, VUP', VPN) * VTM.
-
Translate the COP (represented by the projection distance) to the
origin: VTM = T(0, 0, d) * VTM.
-
Scale to the canonical view volume [CVV]:
-
Let B = B + d.
-
VTM = Scale( 2 * d / (du * B), 2 * d / (dv * B), 1 / B) * VTM.
-
Project onto the image plane:
-
Let d = d / B.
-
VTM = PerspProj(d) * VTM.
-
Scale to the image size: VTM = Scale( - screenX / (2 * d),
- screenY / (2 * d), 1.0) * VTM.
-
Translate the lower left corner to the origin: VTM = T(screenX/2,
screenY/2) * VTM.
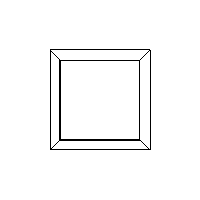
Required Images
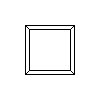
There were two required images for this lab. Both contain a cube with
opposite corners at (0, 0, 0) and (1, 1, 1). The first image is 100x100.
The COP is located at (0.5, 0.5, -4), the VRP is located at
(0.5, 0.5, -2), and the view window size is (du, dv) = (1, 1).
This image can be seen below.
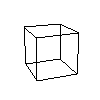
The second required image is of the same cube, but this time it is
viewed with 3-point perspective.
Extensions
Several extensions were implemented. First, three animated gifs were
created to demonstrate the new 3D perspective viewing pipeline. The first
of these images performs a "drive-by" by moving in the x direction
across the world.
The next image is an animated gif as the view moves around the cube in an
elliptical orbit. The VPN is always pointed at the center of the cube.
Finally, the third image alters the value of d linearly and then
sets du = dv = 2d/(d+2). This is similar to changing from a wide angle
to a telephoto lens on a camera. Casey insists that I use the word
"non-trivial" to describe this transformation.
The second extension that we performed was to make all of our code
operational within our hierarchical modeling system. Now, all of the
3D transforms and 3D perspective viewing can be using within modules.
All of our extensions worked properly.
-
What are the (x,y) values for the eight corners of the cube in the
first required image?
The (x,y) values for the eight corners in the first image are:
- (25, 25)
- (75, 25)
- (75, 75)
- (25, 75)
- (30, 30)
- (70, 30)
- (70, 70)
- (30, 70)
-
How does modifying the distance between the COP and the VRP affect
the appearance of the cube in the first required image?
Moving the COP closer to the VRP makes the cube look smaller, while
moving the COP farther from the VRP makes the cube look bigger.
Moving the COP out to infinity is theequivalent of parallel projection.
-
How does modifying the direction of VUP modify the appearance of
the cube in the first required image?
Modifying the direction of the VUP rotates the cube about an axis going
from the viewer to the center of the cube (an axis into the image).
-
How does modifying the size of the view window modify the
appearance of the cube in the first required image?
Making the view window larger makes the cube appear smaller, and vice
versa.
This is because increasing the view window makes the cube take up less
space in relation to the image.
-
What extensions did you do for this assignment, how did you do
them, and how well did they work?
Scroll up for a description of the extensions.